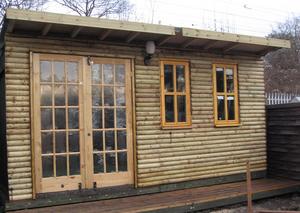
Kev's Kabin: building my garden office
This project got underway in 2004, when I got so fed up with seeing the ugly spiked metal railway fence at the back of our garden (our plot borders a railway line) that I had to Do Something About It. Since I'd been toying with the idea of building an office/summerhouse thingie for some time, it seemed reasonable to put the building right at the back of the garden, and making it tall enough to obscure the metal fence for the whole width of the garden (about 17').
This article describes the construction in 2004/5, and what I've learned by seeing nearly twenty British winters take their toll on the Kabin.
I'm not writing this to explain the best way to build a large, timber garden building -- after all, I'd never built one before either, in 2004 (although I've built a half-dozen more since then). Rather, I'm hoping that other people will be able to learn from my mistakes, which were manifest. It's also worth bearing in mind that my design accommodates some odd features of our house and garden. In particular, the ground has a pronounced slope: about 6" vertically for every 6' in length. This is because our garden is, in effect, on the edge of a railway embankment. There's an almost unlimited amount of soil and gravel above the garden, waiting to slide down if I try to level it out, so I've generally felt that it's better to live with the slope than to try to fix it.
The other limiting factor I had, and which most people don't, is very restricted access to the garden from the road. All the building materials had to be carried through the house, negotiating a narrow passageway. So there would have been no prospect of bringing in a cement mixer, for example, let alone a prefabricated building. The only way to have a substantial garden building was to build it myself from timber and sheet materials.
Why build a garden office?
It's very unlikely that building a garden shed yourself, from the kinds of materials you can buy from a timber merchant, will be cheaper than buying a prefabricated shed from a garden centre. That's even if you don't cost your own labour, which will be considerable. Although many commercial garden sheds are flimsy, you can get sturdy ones if you're prepared to pay a premium.
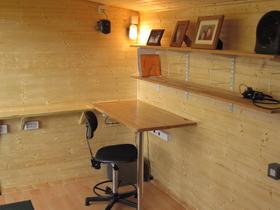
Although you won't save much money, by building a shed yourself, building a garden office is a rather different proposition. Commercial garden offices are designed for all-year-round occupancy, which means they need a high standard of weatherproofing. They include double-skinned walls with insulation, and are designed with close attention to waterproofing and damp penetration (of which, more later). They have double-glazed windows and full-sized, glazed doors. Because an office may house expensive equipment (computers, etc.) security is an issue. In addition, unlike a shed, a garden office needs to have an inviting interior -- no rough-sawn timbers or chipboard floors. After all, if I was going to work in my garden office, it needed to be like a home.
This is why, while a 16'x8' prefabricated shed or summerhouse can be had for £1500-£2000, prices start at about £10000 for a proprietary garden office, and go upwards from there.
One of my design goals was to build a garden office for not much more than the cost of a prefabricated shed of similar constructional specification -- about £2000 in 2004/5. This turned out to be almost possible, giving a considerable saving over a commercial garden office, even including the cost of my time.
Regardless of the cost saving, if any, an important advantage of building a garden office yourself, apart from the fact that the work gives you healthy exercise outdoors, is that you can have exactly the design you want. In my case, I knew the building would be bordered by garden fences on three sides, so there was no purpose in putting windows or doors in those sides. I wanted plenty of door and opening window area for good summer ventilation, but robust insulation and double glazing for winter use. I wanted the door to line up with the garden path, so I could get into the office without first walking across the wet squelchy lawn. I also wanted something that looked a bit different from the usual prefabricated shed, and I got that. Whether it looks better or worse is, of course, a matter of opinion, but it's certainly different.
Design and planning
My first design criterion for Kev's Kabin was that it would should occupy most or all of the whole width of the garden, and be as large as I make have it without involving the local planning or building control departments. Under current UK legislation, planning approval is generally not required for a garden building less than 3m tall at the highest point, and more than 5m from a dwelling, and 20m from a highway. But I discussed it with the neighbours before starting work because, apart from the planning issue, I didn't want to upset them. Since I finished the construction, one of my neighbours has, in fact, put up a building at least four times the size of mine, so I guess I needn't have worried on that point.
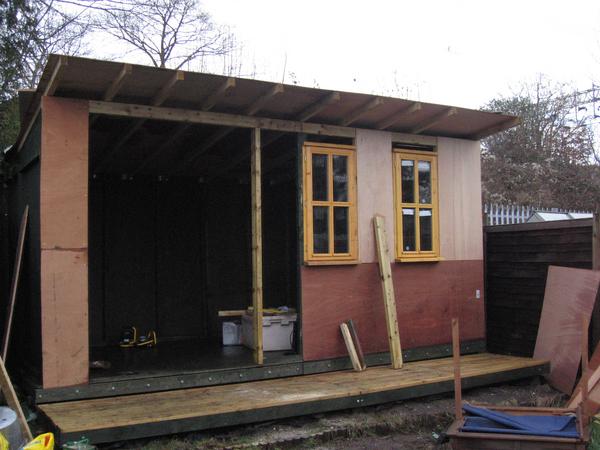
I decided to make the base 16'x8' (or, more precisely, the metric equivalent 2440mm x 1220mm), with a 16'x4' deck to the front, so I could use standard-sized building materials with the minimum of cutting. Cutting is straightforward with the appropriate tools, of course, but measuring for cutting is time consuming. I could have made the front-to-back size greater than 8', but the next standard size up would have been 12', and that's just too big for my garden.
In any case, under UK law, an outbuilding must comply with building regulations if it occupies an area greater than 15 square metres, and is within one metre of the boundary. Presumably this is to reduce the risk of fire spreading between properties. Since my building is clearly within 1m of the boundary, I wouldn't have wanted to make it so big as to require the additional expense and hassle of building regulations compliance. With the front deck, the area of the Kabin is 14.4 square metres.
My next criterion was that the roof should have a single slope from front to back, a so-called 'pent roof'. This was for simplicity of construction, as well as alleviating the necessity to deal with drainage of rainwater from more than one end of the building. I wanted the roof to overhang by at least 18" at the front of the Kabin, so I could unlock the front door in the rain without getting wet.
I wanted to make the roof pitch at least 1:4, so I could use a single layer of roofing felt, and this turned out to be just about possible while still allowing the ceiling to clear my head (6'4") at the lower end. The highest I could have made the front of the roof was 3m (planning restriction), and the lowest I could have made the back was 2.3m (my height, plus the thickness of the joist and roofing material, plus a nominal floor height of 300mm), which -- allowing for an 18" overhang at the front -- gives a roof pitch of 1:4 exactly. That was by luck, rather than design.
I did toy with the idea of building a curved roof (like the garden offices made by Henley) because I thought it would look nice, but I suspected this would be difficult to achieve with timber. In any case, it's turned out to be impossible to see the roof from any part of the house or garden, so I'm glad I didn't expend the extra effort.
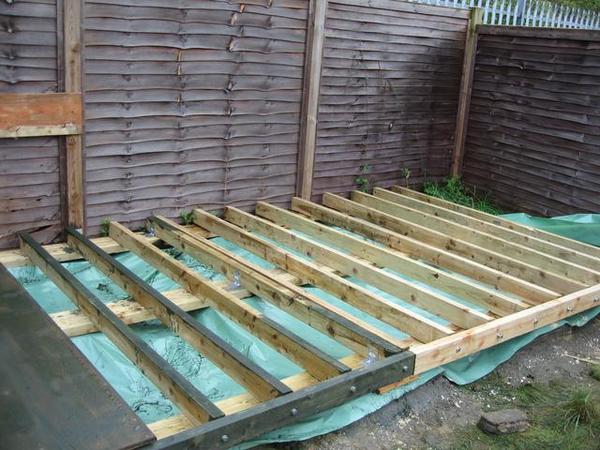
Foundation
A building of this size and weight ought ideally have a poured concrete foundation. I should have dug out a trench about a foot deep, and filled it with concrete. Unfortunately, this was a course of action not open to me for two reasons.
First, the slope of the ground is such that that, if the top of the foundation were perfectly flat -- which, of course, it would have to be -- its surface would have to be about 18 inches below soil level at some points. Not only would this leave me the problem of disposing of several extra tons of soil, it would put the bottom of the building well below ground level. This would make it even harder to keep dry than it otherwise turned out to be. Of course, if I'd had a larger garden I could have levelled a much larger area than the building's footprint, and dug a trench within that. Unfortunately, my garden is small, and the building comes to within a few inches of my boundaries, so this wasn't possible.
The other problem is that as there is limited access to the garden, and none from the road, I would have had to mix several tons of concrete by hand. Now, I don't mind hard work, but that's just too much.
So in the end I built the foundation in the form of 15 "piers", in three rows of five. Each pier consists of a hole about 2'6" across, filled with compacted hardcore and gravel, with between one and four concrete blocks standing on it, depending on the slope of the ground . As you might (sort of) see in the photo, I've concreted all around the piers, so that each is, in effect, a single lump of concrete 2-3 feet across and 2-8 inches high.
I'm pleased to say that, even twenty years later, the foundation is still sound and level; it's the one part of the project I'm completely happy with.
Cost of this part of project (in 2004):
Concrete blocks                             £100
Approx. one ton of sand, cement, and gravel £100
                                                                                      £460
Skeleton and outer shell
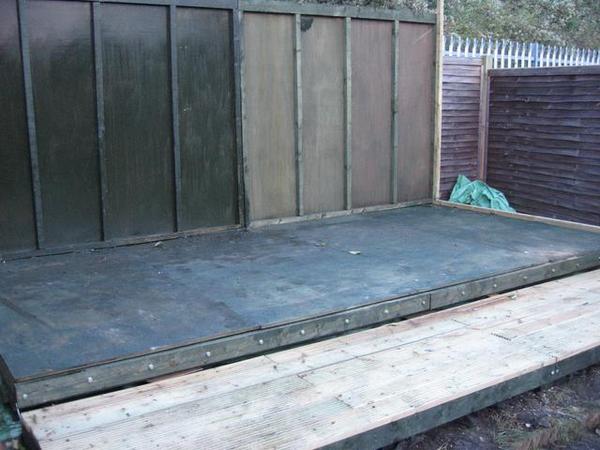
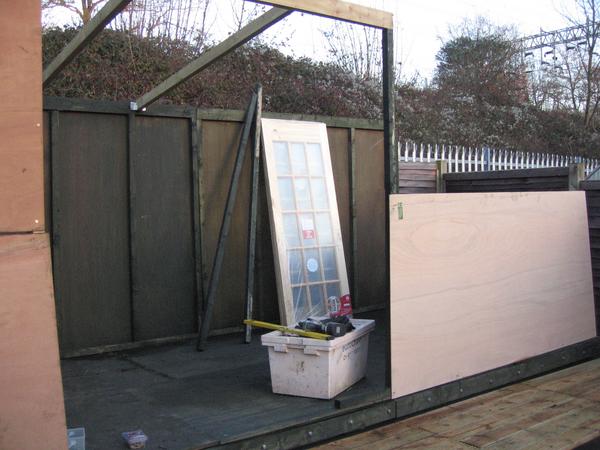
I made the whole of the outer shell of the Kabin, including the roof (perhaps a mistake), from 6mm exterior plywood, screwed to a skeleton of 2"x2" and 2"x4" timbers.
Because I had no access to the rear of the building, at least some of the shell and skeleton had to be pre-assembled and raised into place. I went to town with the wood preserver on the rear plywood, because it was inaccessible for repairs when assembled. My efforts turned out to be badly insufficient, as I'll explain later.
Choosing the roof structure was a bit tricky. Construction and maintenance would undoubtedly have been easier if the roof were constructed to the same standard as the floor, so two people could safely walk about on it. But since the floor cost about three hundred quid in timber alone, I didn't really want to go to those lengths. What's more, the floor bearers and plywood weigh about a half a ton, and I didn't want to add that much weight to the structure to the ceiling as well.
So, rather than aiming for a roof that two large people could walk about on, I went for a joist size and spacing that would support one small adult (i.e., my wife) working on crawling boards. This led me me a rafter size of 3"x2" at 16" spacing. I supported the rafters with metal hangers for speed. The rafters, and thus the roof, overhang the deck at the front by about 18". This overhang does, as mentioned before, shift the centre of mass of the roof towards the front of the building, which adds even more to the unequal front-to-back weight distribution. It turned out that 18" wasn't enough overhang to prevent the deck getting wet repeatedly, and eventually rotting away -- more later.
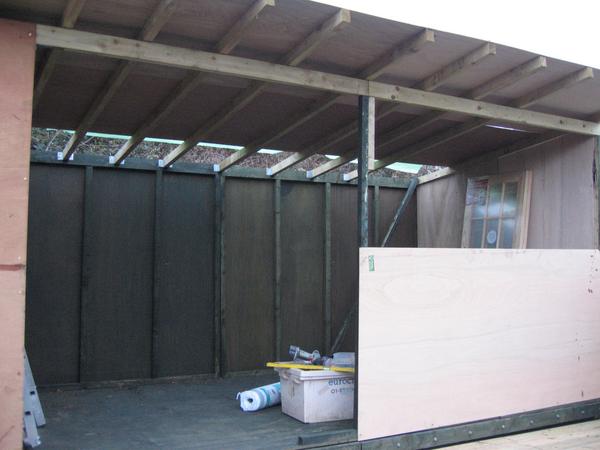
My long-suffering wife felted the roof, because I designed it with her weight, not mine, in mind. We used the same kind of heavy polyester mineralized felt that is normally used for flat roofs, but only the capsheet, not the underlay. Again, this turned out to be a mistake.
It was a horrible job, installing the felt in temperatures of about zero Celsius. Although the bitumen adhesive we used was supposed to be cold-setting, we still needed a certain amount of blowtorch work in these low temperatures.
With hindsight, the 2" roof overhang at the sides and back is clearly not enough, either. Unfortunately, with the Kabin so close to the boundary, it would be difficult to make it much larger.
I obtained two double-glazed, timber framed, opening windows of about the right size from an online auction: cost £25 each, plus £25 for delivery, which was a bargain. Of course, I was in a position to build the structure around the windows, so I didn't have to look for a specific size. I gave them each three coats of light brown wood preserver, because I like the way they look unpainted. Because they're right under the roof overhang, they don't get too much rainwater on them.
Unfortunately, I couldn't get any suitable exterior doors from an auction, or even recover them from skips as I have for other projects. So I had to buy some locally from a builder's yard. These are, strictly speaking, internal doors, so I had to get busy with the wood preserver again. Unfortunately, even though the doors are still sound twenty years later, they swell and shrink with the weather. I shouldn't have been so cheap, and bought proper external doors.
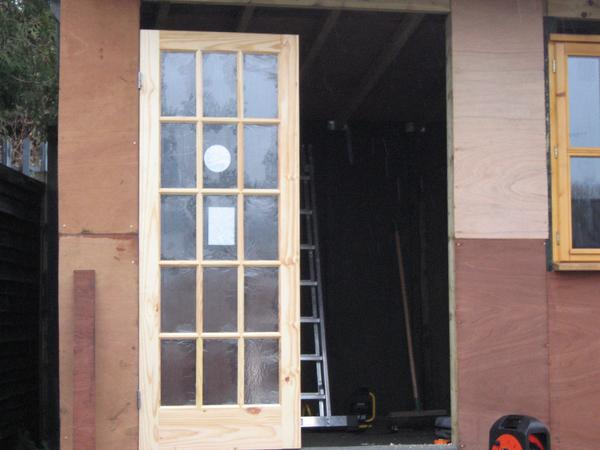
Fitting the double doors was a horrible job and, with hindsight, one that I know I didn't do at all well. What I should have done was to prop the two doors up on the doorstep with temporary supports, then built the frame around them. Instead, I did my best to make the door frame perfectly rectangular using a ruler and a spirit level, not appreciating that the floor wasn't perfectly level.
If the verticals of the door frame are even a few millimetres out of square, the two doors won't meet properly in the middle, which looks ghastly. It isn't even sufficient for the verticals to be perfectly parallel, if they aren't square to the doorstep. Moreover, the verticals need to be not only parallel, but in the same plane (in the front-to-back direction).
Imperfections in the door frame can be ironed out, up to a point, by placement of the hinges. However, more than a few millimetres can't easily be corrected this way. Getting the two doors to meet correctly was a nightmare and, as it turned out, one that I needn't have bothered with, seeing how much they shrink and swell over the course of a year.
Cost of this part of project:
Pressure treated timber                   £160
Exterior WBP plywood                      £160
Roof felt                                 £100
Doors                                     £90
Windows                                   £75
Bitumen adhesive                          £40
Wood preserver                            £35
Screws, bolts, other fixings              £10
Joist hangers                             £10
                                                                                    £115
The total cost of the exterior of the building, not including the foundations but including skids, came to £1255, which compares reasonably well with a prefabricated shed similar construction and size. Of course, that's costing my labour (probably about 200 hours by this time) at zero £/hr.
Cladding the interior
For all-year-round occupancy, it's necessary to insulate the building for heat retention and windproofing. Although a relatively thin layer of aluminium bubble foil has good thermal resistance, it doesn't do much for windproofing unless it's fitted very carefully. It doesn't look all that nice either, if it's visible. For aesthetic purposes, it is better to line the inside of the building with something, and form a cavity that can be stuffed with some form of insulation.

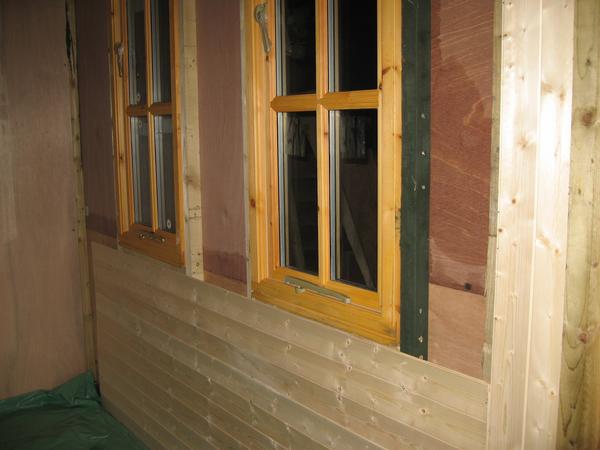
I decided to make the inner wall of the Kabin from 6mm softwood cladding, because it is relatively easy to work, and relatively light in weight. It also looks nice, and when it gets grubby it can be sandpapered, or washed down if varnished. Foil-backed plasterboard would have been a reasonable alternative -- cheaper and quick to fit. The problem with plasterboard is that it is relatively heavy: nearly ten times as heavy as the softwood cladding for the same area. Moreover, it's not as flexible as wood, so I'd have needed heavier studs to support it on.
The cladding I used was the cheapest, tongue-and-grove variety from Wickes. It's possible to glue the strips together to form boards, and then fasten the boards top and bottom like large panels. However, my experience is that cladding fastened this way tends to sag out from the walls when it gets hot, so I fastened each strip individually using the `hidden nail' technique. This involves nailing small pins obliquely through the tongue or edge of the grove, so it penetrates the stud at an angle. It is a horrible, time-consuming job and, even at the time, I wondered whether it's worth the effort.
Sadly, time has revealed the errors in my thinking. It gets very warm in the Kabin in summer, and the thin softwood strips expand and warp. This pushes them away from the wall, and from each other. Twenty years on, most of the strips are still in place, but they don't look as good as they did, even after repeated re-attachments. With hindsight, I should have used thicker cladding, even if it had meant strengthening the studs.
Oh well. I made the ceiling with the same cladding as the walls, and insulated it the same way. I did consider using 8"x4" sheets of 6mm plywood for the ceiling, and I got as far as fastening a couple of sheets up to see what they looked like. For reasons I don't quite understand, they made the ceiling look much lower -- an effect that wasn't apparent with cladding. Of course, plywood would have been enormously cheaper, and taken a fraction of the time to fit.
For the insulation I used a mixture of loft insulation and polystyrene beads, because I had some left over from a previous project. My feeling was that, however big the cavity, it was best to stuff it full, to reduce the airflow path -- thermal insulation is all very well, but a direct draught to the outside will bypass it completely.
It goes without saying that loft insulation needs to be handled with care, especially since it is supplied in thicker layers than the wall cavity. It's even more unpleasant to stuff insulation into a cavity than it is to roll out in a loft, since much more manipulation is required.
When all the cladding was in place, I gave it two coats of thick polyeurethane varnish. Because it was February -- cold and damp -- the varnish took nearly a week to dry to the touch, and a further week for the fumes to stop being noxious. You can get low-odour varnish but, in my experience, it isn't as tough as the stinky variety.
Cladding and insulating the interior of the building was by far the dullest, most time-consuming part of the job. I used about 200 cladding strips, nearly every one of which had to be measured and cut, and then hidden-nailed in up to seven places to the wall studs. Each nail had to be driven meticulously at the proper angle, using a punch to avoid damaging the cladding groves with the hammer. Yawn.
Cost of this part of project:
Softwood cladding                         £205
Insulation                                £30 (estimated)
Rough sawn timber studs                   £20
Pins and screws                           £10
                                                                                  £195
Flooring
There really isn't an inexpensive way to make a nice-looking floor, which is washable and hard-wearing enough for a garden building. I considered and rejected carpet (too expensive), vinyl tiles (too ugly), coconut matting (too difficult to clean), painted plywood (too difficult to clean and too ugly), and a number of whackier alternatives that I'm too embarrassed to mention. In the end I decided to use laminated wooden flooring, the cheapest I could get. This turned out to be Wickes' own brand 7mm beech-effect glue-less flooring, at a whisker under £7 per square meter. Another mistake, as it turns out.
Laminated flooring cannot be laid right to the edge of the floor, because allowance has to be made for expansion. You need wedges (or offcuts of wood, which are cheaper) to stand the floor panels off a uniform distance from the walls. Glue-less flooring needs to be hammered together, which is difficult at the very edges where there isn't clearance to swing a hammer. There's a specific tool for dealing with this situation -- a bit of bent steel which hooks over the edge of the flooring and provides a sticky-up plate to hit with the hammer. This tool usually comes in an installation kit that includes the wedges and a hammering block. You'll need the hammering block, because if you hit the edge of cheap laminated flooring with the hammer itself, it will collapse.
Cost of this part of project:
Laminated flooring                        £75
Underlay                                  £20
Installation kit                          £10
Vapour membrane                           £10
                                                                                    £154
The total cost of the interior, including wall and ceiling cladding, insulation, flooring, electrical fittings, lights, and trim was £729.
What I learned
OK, so the following may be obvious to some people, but even after ten years (at that time) of hardcore DIY activity, including renovating a dilapidated house, they weren't obvious to me at the time.
Wood preserver is designed to soak right into wood
Obviously -- it wouldn't work otherwise. What this means is that if you spill coloured wood preserver on wood where it isn't supposed to go, you'll never get the colour out, even with sandpaper. I used green wood preserver for the parts of the building that wouldn't be clad, and which might just about be visible. But it's painfully noticeable if you spill it on wood that's intended to remain wood-coloured.
Bitumen dissolves in wood preserver solvent
In places where bitumenised roofing felt came into contact with timber that I'd treated with wood preserver, the wood preserver dissolved the bitumen and soaked it up into the wood, leaving an ugly black stain that (sigh) permeated the entire thickness of the timber. Make sure wood that's been treated is fully dry before putting it near roofing materials.
You can't screw two pieces of wood together so tightly that water cannot penetrate.
Because wood, particularly unplaned wood, is never perfectly flat, the join between timbers will always be big enough to let some water through if it gets wet. There needs to be sufficient access to get some frame sealant around the join after construction.
Water needs to drain away
If you allow water to pool anywhere, it will most likely find a way into the building.
It's impossible to make a double-door frame sufficiently accurate by measurement alone
The frame needs to be built around the doors. Building a double door frame is completely different from building a single door frame -- with a single door the battening around the door will hide even substantial inaccuracies in the frame or the hanging. With a double door, it's all on display.
Mixing concrete in large quantities is hard work
If you have to make a foundation, even in the form of concrete islands like mine, it's got to be worth hiring a mechanical mixer. Or, even better, have it delivered wet by a truck. I couldn't do either here, because of poor access.
Building something like this takes longer than you think
It isn't the substantial construction that takes all the time, its (a) the preparation, and (b) the fiddly little jobs that you forget to account for. Preparation includes things like treating timber with wood preserver (it's slow, tiresome, and it takes ages to dry), digging and levelling ground, and carrying and stacking huge piles of timber. Fiddly little jobs include fitting door furniture, trimming and finishing roof felt, picking all the stupid barcode labels off everything (I just hate that), sealing up gaps between timbers.
If you can't work on the job continuously, you also have to account for the time consumed by getting ready to work and tidying up, and the constant sweeping, cleaning, and tidying that are required to prevent the site turning into an eyesore.
The quicker the roof goes up, the sooner you can use the building for storage
If you're working intermittently, it's much easier to be able to leave tools and materials in the partially-constructed building, than to get them out and put them away every time you want to work. But most tools and materials aren't particularly waterproof, so you'll need to have at least one wall and part of the roof up before you can leave stuff in the work area even overnight.
If you have even a few roof joists up, you can make a temporary roof of (say) corrugated plastic sheeting, even if you're going to use something different for final roof. The time you'll save by being able to leave tools and materials in the building more than compensates for the time taken to put up the temporary roof. But don't be tempted to put up part of a plywood roof -- ideally it all needs to go up together and be felted the same day. Roofing felt doesn't stick very well to wet plywood.
October is a bad time to start work on a major outdoor DIY project
It gets dark early, it rains all the time, and it's cold. And if the work takes longer than you anticipated, you'll be trying to felt the roof in January when it's freezing.
Some jobs are too big to do single-handed
However enthusiastic, strong, or competent you are, some jobs need more than one person -- it's as simple as that. Screwing the fascia boards to the overhanging roof rafters was a case in point. With one person to hold one end up, and another to hold the other end and screw the boards to the rafters, it would have been a five minute job. Single-handed it was a two-hour job. Longer, if you count the time I spent dressing the wound after I screwed my sodding finger to one of the rafters.
Yale-type night latches are designed for inward-opening doors
Shed doors typically open outwards, because there's more room outside than inside. If you fit an inward-opening latch on an outward opening door, you'll find that you need a key to close the door, but can open it without one. This, of course, is not ideal. I was able to dismantle the latch I bought and reverse the locking tang, but it still means that when you close the door, the locking tang strikes the wood, not the metal of the lock body. I'm not sure if anybody makes a night latch specifically for outward-opening doors.
How much did I save?
With hindsight, building Kev's Kabin turned out to be a more ambitious undertaking than I anticipated. What's more, I deliberately did the work during the winter, because I had other plans for the summer, and the days are rather short in December. I started work at the beginning of October 2004, and finally declared the job done at the end of March 2005. That's seven months from start to finish. My recollection is that I worked for three full weekends (7am Saturday to 6pm Sunday), a couple of Saturdays, and between 30 minutes and an hour about three evenings a week, with a break of three weeks over Christmas. This adds up to about 300 hours of work. A team of three people, working a typical 8-hour day, would have racked up these hours in about three weeks. Working alone, evenings and occasional weekends, came to seven months.
In fairness, when working out the cost saving over buying a commercial garden office, I really ought to account for the time I spent driving back and forth to timber yards and builders' merchants, searching the web for suppliers, and poring over my computer doing the design and calculations. But I can't -- I really can't remember how long all this took. On the other hand, if I had opted for a commercial offering, I guess I'd have spent a considerable amount of time investigating manufacturers and comparing prices, so maybe it balances out in the end.
As for the financial cost:
Foundation                                £200
Frame and exterior                        £1255
Interior, electrics, and trim             £729
                                          ----
Grand total                               £2184
For the purposes of comparison with a commercial garden office, the cost of the foundations should be excluded, since I'd have had to lay foundations in either case. So the relevant figure is £1984.
It's hard to be sure how this bottom-line figure compares with a commercial garden office. In 2004, similar proprietary outbuildings cost upwards of £12000, and the cheaper ones didn't have solid wood walls, floors, and ceilings (they're glassfibre and MDF).
So, by building my own, I estimate that I've saved at least £10000 -- a figure not to be sniffed at. Allowing 300 hours labour, this makes my `earnings' £33 per hour. All in all, not a bad deal.
Then it all went horribly wrong
Of the many mistakes I made in building Kev's Kabin, the worst was to place it so close to the boundary of my property. It was fine for about ten years, going from an office, to a playroom, to a workshop. Eventually, though, the roofing felt started to decay, allowing water to enter the building between the two skins of the rear wall.
I just accepted that the building was going to be damp and a bit nasty for another five years. After all, it had become a workshop by that time, and I wasn't too worried about the cosmetic state. What I didn't realize was that the water was rotting away the outer skin of the rear wall -- which I couldn't see -- and running into the gap between the plywood base and the laminated flooring.
Eventually the floor became so rotten that I put my foot right through it, and I stopped using the building entirely. At that point it became completely colonized by spiders.
Eventually, increasing occupancy of my house let me to try to reinstate that Kabin. I had to take down my garden fence, and get to the rear wall from outside. It took two whole days to cut down the brambles behind my property, so I could get access to replace the rotten wood. I stripped off the rotten roof felt, and re-roofed the building with heavy butyl rubber sheeting -- which I would have used in 2004, had it been invented. I extended this sheeting all the way down the sides of the building as well, knowing how difficult access will be with the fence back up.
That left the problem of the floor. Although the laminated flooring had mostly rotted away, as had some of the plywood, the underlying bearers were still more-or-less sound. So, as I didn't want the effort and expense of replacing the whole floor, I treated the rot as best I could and, once the floor was dry, I put down an additional layer of hard plastic flooring -- again, not available in 2004.
The decking to the front had mostly rotted away, so I had to replace it. Happily, I had a bunch of offcuts from other projects, so this wasn't expensive. I also covered the decking with rather ugly steel mesh, knowing how vulnerable it is to the weather. At least the mesh will stop my foot going through, when the deck eventually rots away again. It also has the advantage of making the deck less slippery when it gets wet.
These weren't perfect repairs, by any means, but they've brought the Kabin back into service. I'm aware that it won't last forever but, at my age, it's a coin-toss whether it falls apart before I do.
Published 2026-02-24, updated 2026-02-24
Categories
DIYConverted from my Gemini capsule.